So, backstory. (Yes. I do backstory.) I have an event coming up this fall that requires at least one new dress, if not two, in a Regency style. So what do I do? I decide that I would also like to have new underpinnings and a new dress for Civil War reenacting.
Because I am, clearly, out of my mind.
Cue the Laughing Moon Silverado corset. (I tried the Simplicity corset pattern a couple of years ago. UGH. Do not recommend.) I did my research, read the reviews, sifted through sewing blogs that talked about Victorian undergarments. The clock started ticking, and I started sewing.
First came the busk. You can't pick up a busk in a fabric or craft store. I went to corsetmaking.com for this one. Here it is, sewn into the mockup pieces, draped artfully across the ironing board.
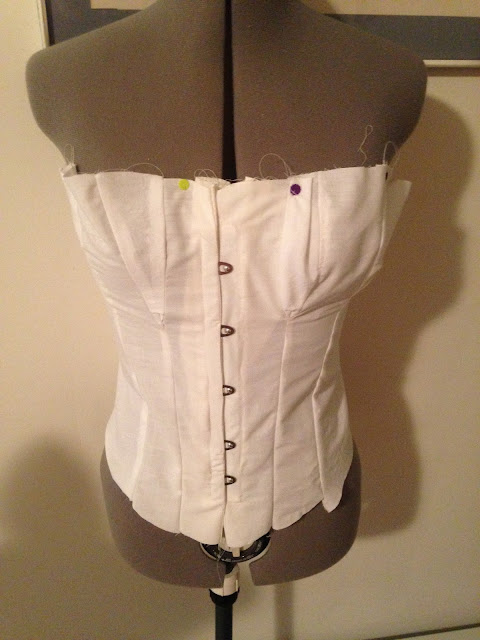
You absolutely have to make a mockup for a corset. I am generally lazy and do not wish to do the mockup step with a new pattern. For a corset, though, it's essential. As seen below.
Yeahhhhh, Laughing Moon patterns run large, turns out. So I went down a size and actually followed the directions for 5/8ths-inch seam allowance instead of my usual skinflint 1/4-inch. Much better.
Here it is pinned onto my trusty Mademoiselle. Note the pins because Mademoiselle isn't quite humanly shaped and doesn't have the same... give and take that the actual Me is in possession of. So the pins kept the mockup on Mam'selle for the picture. (Yes, it actually fit me quite well. No, I am not posting a picture of it on me because, c'mon, it's still underwear.)
The pattern book (yes, it's actually a book, not just a sheet of instructions- VERY thorough) suggested flatlining fashion fabric to a sturdier background for a little more support, so I took that advice and sewed a lightweight striped cotton to a patterned cream quilting calico. I didn't have anything heavy like twill on hand and wanted to make this on a budget, so it was a good solution.
Close-up of the backing fabric. This got sandwiched between the outer fabric and the lining in the completed version, so that was my last glimpse of it. Farewell, white flowers on a cream background. You were cute, but not long for this world. Hope you enjoy the rest of your life being purely functional with no decorative capacity.
Once a few of the regular pieces were together, it was time to put in the bust gussets. These are sewn normally with right sides together and then topstitched for additional reinforcement. Yes, this was the fourth attempt. It finally turned out all right. :P (Plain white fabric in the photo above is the lining. I didn't bother taking photos of both the lining and outer layer, as the construction is exactly the same.)
A longer shot of the middle busk piece as well as the side gussets. This was the part that involved a lot of Fitting and Fussing and Fidgeting. Eventually I just took a deep breath, made a wish, counted to three, and left it as it was, because it looked like it fit but I knew I was never going to be quite sure until the boning was in and the whole thing was laced up. (And THAT, children, is called FORESHADOWING. Duhn duhn duhn.)
And speaking of lacing, it was time to make EYELETS. The pattern suggest expensive metal grommets that you punch through the fabric with an expensive grommet awl thingy. Why do that when you can have hand-sewn eyelets (period correct, to boot!) for a teensy fraction of the price? The only cost? YOUR SANITY. And fingertips repeatedly stabbed by the back end of a heavy duty needle. (Not delightful.) And several episodes of Call the Midwife, except that part was most definitely not a bad thing.
Close-up of the eyelets. Difficult and painstaking (and pain-inflicting) as they may be, they do look pretty doggone good, and produce a feeling of accomplishment. I MADE DAT.
Tune in somewhat shortly for Part Deux, in which we put the corset on a chemise on a plastic dress form, and see how it looks. (And then under a dress. Hopefully.)
What are you sewing these days? (If you sew, that is. If not, tell me a good joke so as to have something to say in the comments.)


