Showing posts with label sewing. Show all posts

Monday, September 5, 2016

Victorian Silverado Corset, Part I

Otherwise entitled, In Which I Post Pictures of Underwear on a Public Blog, Thereby Scandalizing the Good Ladies of Cranford and Corrupting the Eyes of All Children Present.

So, backstory. (Yes. I do backstory.) I have an event coming up this fall that requires at least one new dress, if not two, in a Regency style.  So what do I do? I decide that I would also like to have new underpinnings and a new dress for Civil War reenacting.

Because I am, clearly, out of my mind.

Cue the Laughing Moon Silverado corset.  (I tried the Simplicity corset pattern a couple of years ago.  UGH.  Do not recommend.) I did my research, read the reviews, sifted through sewing blogs that talked about Victorian undergarments. The clock started ticking, and I started sewing.

First came the busk.  You can't pick up a busk in a fabric or craft store.  I went to corsetmaking.com for this one.  Here it is, sewn into the mockup pieces, draped artfully across the ironing board.


You absolutely have to make a mockup for a corset.  I am generally lazy and do not wish to do the mockup step with a new pattern.  For a corset, though, it's essential.  As seen below.


Yeahhhhh, Laughing Moon patterns run large, turns out.  So I went down a size and actually followed the directions for 5/8ths-inch seam allowance instead of my usual skinflint 1/4-inch.  Much better.


Here it is pinned onto my trusty Mademoiselle.  Note the pins because Mademoiselle isn't quite humanly shaped and doesn't have the same... give and take that the actual Me is in possession of.  So the pins kept the mockup on Mam'selle for the picture.  (Yes, it actually fit me quite well.  No, I am not posting a picture of it on me because, c'mon, it's still underwear.)


The pattern book (yes, it's actually a book, not just a sheet of instructions- VERY thorough) suggested flatlining fashion fabric to a sturdier background for a little more support, so I took that advice and sewed a lightweight striped cotton to a patterned cream quilting calico.  I didn't have anything heavy like twill on hand and wanted to make this on a budget, so it was a good solution.


Close-up of the backing fabric. This got sandwiched between the outer fabric and the lining in the completed version, so that was my last glimpse of it.  Farewell, white flowers on a cream background.   You were cute, but not long for this world.  Hope you enjoy the rest of your life being purely functional with no decorative capacity. 


Once a few of the regular pieces were together, it was time to put in the bust gussets.  These are sewn normally with right sides together and then topstitched for additional reinforcement.  Yes, this was the fourth attempt.  It finally turned out all right. :P (Plain white fabric in the photo above is the lining.  I didn't bother taking photos of both the lining and outer layer, as the construction is exactly the same.) 


A longer shot of the middle busk piece as well as the side gussets.  This was the part that involved a lot of Fitting and Fussing and Fidgeting.  Eventually I just took a deep breath, made a wish, counted to three, and left it as it was, because it looked like it fit but I knew I was never going to be quite sure until the boning was in and the whole thing was laced up.  (And THAT, children, is called FORESHADOWING. Duhn duhn duhn.)


And speaking of lacing, it was time to make EYELETS.  The pattern suggest expensive metal grommets that you punch through the fabric with an expensive grommet awl thingy.  Why do that when you can have hand-sewn eyelets (period correct, to boot!) for a teensy fraction of the price?  The only cost? YOUR SANITY.  And fingertips repeatedly stabbed by the back end of a heavy duty needle.  (Not delightful.)  And several episodes of Call the Midwife, except that part was most definitely not a bad thing.


Close-up of the eyelets.  Difficult and painstaking (and pain-inflicting) as they may be, they do look pretty doggone good, and produce a feeling of accomplishment.  I MADE DAT.  

Tune in somewhat shortly for Part Deux, in which we put the corset on a chemise on a plastic dress form, and see how it looks.  (And then under a dress. Hopefully.) 

What are you sewing these days?  (If you sew, that is.  If not, tell me a good joke so as to have something to say in the comments.)

Thursday, August 18, 2016

Voyage Into Sewing Blogging

"Charles, I SAID tell me when you are READY to take the picture, and not ONE SECOND BEFO--"

I don't blog very much about sewing here anymore, but I am planning to change that.

Actually, I don't blog very much here anymore, period, but I am planning to change that.

Some of you who know me "in real life" may already know this, but I am mildly involved in Civil War reenacting, with a keen interest in being involved on a deeper level. Time constraints, financial constraints and the fact that I don't live in the middle of a national park slash historic battlefield all contribute to limit my participation in every living history/battle reenactment that comes down the turnpike.  However, I'm in possession of a job, a car and a chaste selection of unoccupied weekends.  I could go to more events.  My biggest problem?

My wardrobe right now doesn't cut it.

See, I started going to Civil War events "in costume" (you're supposed to say garb, not costume, in the Circles Who Know What They're Talking About) in the early summer of 2013, at which time I sewed an 1860's-ish (pay attention to that suffix ISH) day dress out of quilting cotton.  I vaguely followed the Simplicity 2887 pattern and the finished product was... well, it wasn't great, but for a first Victorian-esque dress it wasn't horrendous.  However, it is not period correct for a multitude of reasons.  That dress is now a "ball gown" (again, pay attention to the quotation marks) and you can read more about how it got that way by clicking the link above.  Still... not half as period correct as it could be.  Although the lace is fun.

Later on I made myself a somewhat Little-Women-inspired ensemble that consisted of a skirt and matching zouave jacket, but since I knew very little about appropriate fabric use and since my inspiration mainly came from book covers that I had liked when I was younger, the dress was made out of a solid red broadcloth and trimmed with polyester black braid.

Heh.

Again, it served its purpose for the time and I got a lot of wear out of it and enjoyed the process of making it (AND learned quite a bit about putting together a garment that would actually fit) sO I definitely don't consider that dress a wasted effort.

Still and all, I need some new clothes, and I need some new clothes that look right.  And since half the fun of sewing things is getting to show them off, whether in person or online, I fully intend to document the creating process here at the blog before I wear the finished product to an event.  Plus, writing posts about what I'm sewing is great motivation to, y'know, actually complete whatever it is I started.  My mom could tell many fascinating stories of the half-finished articles of clothing that have been stashed away and never seen the light of day again because I got bored halfway through.  Um, anyways.

So, if you've followed this blog for slightly snarky movie reviews in the past and do not wish to see anything else, well, you may not be stopping by quite so often in the future. (Not that there's been much to read about in the past few months anyway... cough cough cough.)  I'm certainly not intending to make this blog into a strictly needles-and-thread domain, which is why the title is staying the same and nothing is changing as far as the Look and Feel at the moment.  But blogs change as people change, and my interests today are not quite the same as those of the sixteen-year-old girl who first hit publish on her inaugural post at this domain nearly five years ago.  So, expect to see a good deal more about what I've been stitching, and if that's not your thing and you'd prefer not to stick around, I completely understand.  (I may hop back in with a tongue-in-cheek takedown of Julian Fellowes' new monstrosity Doctor Thorne at any moment, though, so consider yourself forewarned if you hit that unfollow button.)

What else, what else... oh! And I made an Instagram for sewing stuff too.  So take a sneak peek if you feel inclined, because there are snippets there from what I'm working on right now.  A real post about THAT project will follow.

....Soonish.

Sunday, January 18, 2015

The Refurbishing Saga: Or, How I Turned a Day Dress Into a Ball Gown


This is the story of a dress that started out with a career by day and ended up working the evening shift, a dress that was plain-Jane (as in Jane Eyre, as she was one of the style inspirations) and became Cinderella-at-the-ball.  As in, literally at a ball, because I wore it to a Victorian Christmas dance hosted by a local Civil War reenactment group.  (It was a blast, to use a very un-Victorian turn of phrase.)

And today I'm here to tell you how it happened, just in case you're interested in refurbishing a dress of your own.  I've always thought it a very old-fashioned, bookish thing to be restyling a dress to serve a new purpose-- very Little Women-esque.  So when my sisters and I were invited to this ball and I started thinking about what I wanted to wear, this dress popped into my head and I couldn't resist seeing what could be done with it.  (Last year we attended the ball as well, and I wore this outfit, but though it was fun and festive and fit nicely, it was difficult to dance in as the blouse kept coming untucked.  Heh.  So this year I wanted a one-piece dress.)


I started by examining the original dress and deciding what needed to go and what could stay.  The first main element that I needed to get rid of was the sleeves-- they're decidedly 1850's-full, and long for daytime wear.  What I wanted was an 1860's evening dress, so off came the sleeves.  I love my seam ripper.


With the sleeves off, the next step was to bind the raw edges to prevent fraying later.  I used a zigzag stitch on the sewing machine.  A handsewn whipstitch would be much more period appropriate, but ya know what, I live in the 21st century and no one's going to see the bound edges.  I went for the machine.


The original armscyes in this dress were much too big on me-- this was actually only the second Victorian dress I ever made, and I was still figuring that stuff out.  (The original dress was loosely based on Simplicity #2887... I say "loosely" because I eliminated most of the trim and the collar, replaced the princess-seamed front with a regular waistline and gathered skirt, and changed the sleeves entirely.  So basically the bodice was the same.  Sort of.)  Anyway, I took the armscyes in slightly and then trimmed the top of the armholes to create less of an off-the-shoulder slope where the sleeves attached.  (Didn't get a picture of that step, though, sorry.)


Then I took a ballpoint pen because I hadn't bothered to invest in chalk or a fabric pen *cough* and marked where I wanted the new neckline to fall.  Ignore the random flower pin stuck into Mademoiselle's patient and unresisting fabric-skin.  ...Actually, don't ignore it because I want to give these pins a shout-out.  They were a birthday present from Melody last year and I absolutely adore them-- SO much better than standard straight pins.  If you drop one, the flower head makes them much easier to see in the carpet, and they're longer than standard pins so you can cover more territory on long seams.


Neckline cut! Yiiiiiiikes.  Past the point of no return and all that.  Now it's time to bind it off.  I considered making my own bias strips to bind the raw edges, but I didn't have enough leftover fabric and it would have taken forever. So I simply basted the two edges together (there's a full lining inside the bodice, btw-- forgot to mention that) and...


...finished it all off with cream-colored lace bound around on both sides.  Simple and effective.  Plus it looks cute.  If I do this again I won't cut the neckline quite so wide, though.  It wasn't too low, per se, but it ended up gapping a little more than I'd anticipated.  I ended up wearing a 21st-century camisole under it at the ball for modesty's sake, heh.  In the future I'd probably take some small darts at the sides of the neckline to create a more square shape and allow it to lie flat along my collarbone.


Sleeve time!  I didn't get rid of the sleeves I removed, of course-- just saved them for later. I measured how long I wanted my sleeves to be and then cut that much out of the original sleeves, making them just a tad narrower than the previous ones.  Enough space to gather the tops, but not quite so much fullness as I'd had before.


The skirt, though not needing any adjustments to make the change from day dress to evening gown, was looking a bit plain, so I decided to add a strip of lace trim near the bottom to dress it up a little.  I just ironed the skirt, pinned the lace in place and sewed a really long running stitch along the top side and bottom side to keep it on while listening to  the A Tale of Two Cities soundtrack. (Highly recommended.  James Barbour's voice is the stuff dreams are made of.)


Then I took a long piece of 4" wide lace, pleated it, pinned it in place over the neckline and sewed it down by hand.  I don't have a picture of the process, unfortunately, but here's how it looked when it was done.  Now the dress is starting to look, well, dressy!


A close-up of the neckline.  I considered binding the edges again with ribbon or something, but discovered I didn't have anything that matched or complemented the color, so I just left it as it was.  


Close-up of the newly trimmed hemline.


Finally, I cut out cuffs for the sleeves, gathered the bottom of the sleeves to the cuffs, gathered the tops of the sleeves and inserted them in the armscyes and the dress was done!  I'd experimented a little with adding more lace to the cuffs of the sleeves, a la The Young Victoria, but it ended up looking silly so I got rid of it. :P


It's still not a truly authentic 1860's evening gown, being cotton print instead of solid silk, satin or taffeta, but I was very pleased with how it turned out-- and it served me well through the Gothic Reel and the Soldier's Joy and all those other delightful dances.  All in all, I'd call this project a success. :D

What have you been sewing lately?

Friday, April 26, 2013

Permit me to make an introduction...

Friends of the blogging world, there's someone I'd like you to meet.  

No, I don't have a suitor.
Was that what popped into your head when you read the post title?
:D

Nope, this someone is of the female variety.  She's a bit hard to talk to, but quite accommodating once you get to know her.  I can't exactly say that she has a good head on her shoulders, but she's dependable.  She's rather stiff, but is willing to adjust when you have other plans for her-- in short, she is quite the nicest dressmaker's form anyone could ever want, and I think she and I are going to be great friends.


Her name is one I chose myself, and after much deliberation and consideration of many literary characters' names, I decided to bestow upon her the all-encompassing title of Mademoiselle.  Mademoiselle, meet the Readers.  Gentle Readers, this is Mademoiselle.

Mademoiselle has proved most useful and helpful over the last few weeks (she was a birthday gift in celebration of my first eighteen years on this earth, and I've had her for nearly a month now) as I scurry around like a distracted mouse getting ready for a Big Event.  You see, in two weeks I shall be advertising Miss Dashwood's Historical Costuming in the Young Entrepreneurs' section at the Christian Homeschool Association of Pennsylvania's (CHAP) annual conference.   (Mentioning all this because if you're going to be at the convention, do please stop by my booth!!  I would so love to meet you!)

So I've been very much occupied of late in getting as many sample items ready as possible.  And Mademoiselle's been a dear in putting up with it all.

She has modeled...


...and helped with fitting (though she's not built on the exact same proportions as I am, so a closely fitted bodice is not the easiest thing in the world)...


I call this dress the Donwell Strawberry dress-- not because it's printed with actual strawberries (they are in fact wee rosebuds) but because it rather reminds me of the dress Emma wears to Donwell Abbey during the strawberry outing when everyone is being horrid to Jane Fairfax (click image to enlarge).


I had some pictures of her modeling some petticoats I've made, but I seem to have somehow deleted them, so I'll have to take them again another time.  Sigh.

Anyways, I shall close this short but rambly post with a few more pictures of the dress above-- in that picture, the buttonholes are still in progress and the dress is pinned onto Mademoiselle so that it will lay (lie?) properly.  It's an 1850's style, a design I've dubbed the Esther Summerson, and it appears to maximum advantage when the model is wearing a corset.  Now, Mlle. is capable of wearing a corset, but since she's a bit unyielding, the corset doesn't perform its functions as well as it ought to.   So here's the dress on me (and there's a corset on me, too, but I'm not posting pictures of THAT.)


Forgive the "down" hair.  I was in a hurry and hadn't had time or inclination to put it up.  But as we all know, properly styled hair is totally not necessary to achieve the historically accurate look, right?  Right?  Perhaps I should just get myself a job in a Michael Landon Jr. movie...

Thursday, September 6, 2012

Georgian Peasant Dress

This could also be called a colonial dress.  Legitimate name and all, but since I've been studying more about historical costume I prefer to call it a peasant dress from the Georgian era.  It sounds much more Learned.

Anne-girl was kind enough to take these pictures for me last evening, although I think we did it a bit too late in the evening.  It was actually seven-thirty, contrary to what the appearance of the photos might suggest about midnight.


 Above is a top view of the dress.  It's actually two pieces-- the dark blue is the overdress (one piece) and the white ruffles you can see at the neck and sleeves are part of a shift (or is it chemise?) worn underneath.  The Felicity dresses made by American Girl are usually just one-piece (with ruffles sewn into the neck and sleeves) but that's not historically accurate, so I decided to make mine two pieces.

The nice thing about the shift/chemise (help me, someone, and tell me what it's supposed to be called) is that it can be worn with other outfits too.  I've been experimenting with a Lorna-Doone-style bodice of late, and that could be worn over the shift with a gathered skirt for a 17th-century look.


Notice my lovely period-correct shoes (er, lack thereof) and 21st-century cuff socks.  I suppose I could make some 18th-century stockings, but the idea is not particularly appealing.  The dress is, in general, long enough to cover up any anachronistic footwear.


We moved indoors when the lack of light became too much of a problem, and she took a few shots of the back view.  I used these instructions to make the bodice pattern, by the way, and the eyelets are all hand-sewn from these instructions.  The sleeves are simple rectangles gathered at the top, and the skirt is made from the skirt front pattern piece of the Regency dress (Simplicity 4055, B).  I simply cut four of those, sewed them together, hemmed them and gathered the top to match the bodice.  It's intentionally longer in the back than in the front, for ease of walking.  Oh, and I used two ribbon ties, sewn on either side of the placket, to close the dress at the hips.  The bodice is laced with embroidery floss-- not ideal, but it's what I had on hand. Do you have a suggestion for something a little more practical?


Technically I should be wearing a petticoat under this, but I haven't made one yet.  The shift is long enough to serve all purposes at present.

I'm currently working on a mock-up for a Victorian ball gown (it's looking more like a modern dress, unfortunately, but I'm doing what I can) and today began cutting out pieces for a 50's-era party dress.  I was thinking of posting a tutorial for the 50's dress, if it works out-- would anyone be interested in reading that?  I don't intend to turn this into a sewing blog, but I do plan to blog about sewing from time to time.  What do y'all think?

Wednesday, August 29, 2012

The Marianne Dashwood Photo Shoot


A dear bloggy friend who shall remain nameless (she knows who she is...) was recently teasing me about my inability to keep a secret.  We were chatting away on Gmail and the topic of Anne-girl's approaching fifteenth birthday came up.   I could not remember how the friend who shall remain nameless might have known that Anne-girl's birthday was coming close, so I asked and she responded with: "You, being as silent as the grave, of course, mentioned on the blog that you are making a Regency-era dress for her birthday and that you told her so way before her birthday."

This (to quote Mr. Knightley) is true.  But it is also true that I was compelled to tell the dear girl about the dress in order to make sure that it fit.  Because you know, it's a dreadful thing, Sparkler, to make a dress and find it doesn't fit.  Especially if it's a first attempt.  (The practice dress I made out of bedsheets does not count, and only Melody will ever know just how dreadful that one was... let's just say I have now learned which end of the skirt is supposed to go At the Top.)  So Anne-girl was accordingly told about the dress, fittings were held, measurements were taken, and then the sewing machine was whisked out and a great deal of work ensued, accompanied by my beloved Pandora (because I cannot sew without music).

The great day arrived, the dress was duly unwrapped and oohed and ahhed over, and shortly thereafter Anne-girl and I hied ourselves to the backyard with my trusty camera to do a Marianne Dashwood photo shoot.   (I dubbed it a Marianne Dashwood shoot because Anne-girl's hair reminds me of Marianne.  Someone back me up on this.)

Due to privacy concerns and creepers on the Internet and flying purple pirate monsters, we have elected to share only the pictures that do not show Sister Dear's face, as I'm sure you will all understand.  You can scroll to the top of the page for a front view of the dress...


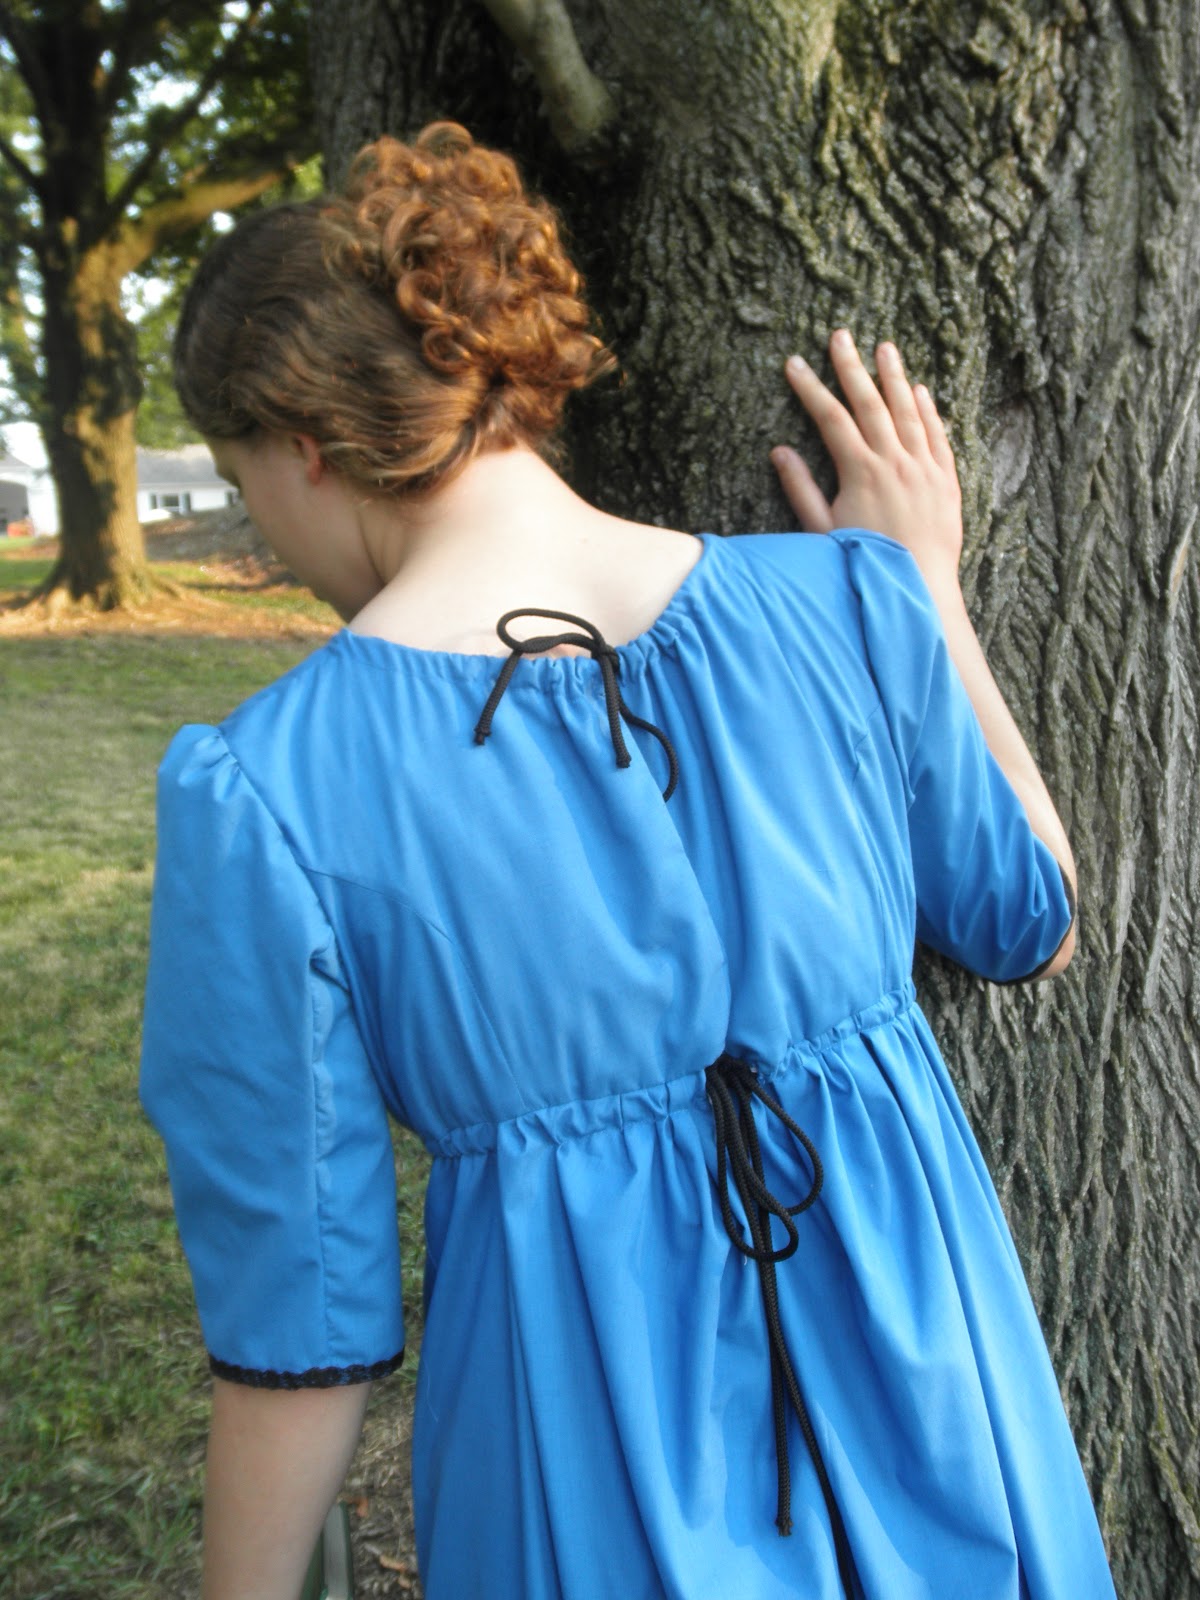
...and here is the back view.


Oh, and at this point I should say that I used Simplicity Patter 4055, dress B, which turned out to be quite simple once I understood the directions and had some help from Melody.  (A friend in need is a friend who flies to her computer and frantically emails her Tween for advice when the placket instructions don't make sense.  A friend indeed is a friend who promptly emails back with minute instructions and is even kind enough to scan a pattern piece into her computer when the friend in need is so silly as to lose piece 17.)


I love how the back is so nice and full for ease of movement.
"But I've BEEN on a walk today!"
"You need another!"


When the photo shoot was over, Anne looked at her hair with the help of a hand mirror and said, "How did you do THAT?"  (She's expert at complex hairstyles.  I do ponytails.)
"Um, I grabbed it and bunched it flat against your head and stuck hairpins in until it stayed up without my hand."
"Yeah... well, it's falling out."

Humph.  It was pretty while it lasted.


The dress pattern does not call for trim on the sleeves, but I felt the black lace added a little flair to them and dressed it up a wee bit.  The sleeves are not intended to be this length, either, but at Melody's suggestion I shortened them from their original wrist-length.  I like them better this way.

"Oh, those Lucases are such artful people indeed. They are all for what they can get!  However, your coming just at this time is the greatest of comforts.  And we are very pleased to hear what you tell us about the latest fashions for long sleeves."
~Mrs. Bennet, P&P95